
Do you know what is SSH? If yes then move to the next step how to enable ssh in ubuntu. If you don’t know, listen to my words.
SSH (Secure Shell) is a cryptographic network protocol used to establish a secure connection between the client and a server, and both can communicate securely on an encrypted channel.
It allows the client to transfer files securely and perform the administrative task on the server remotely by accessing the command line interface on the client machine. The client machine may have an operating system like Windows, Linux, MAC and other.
Before continuing with this tutorial, make sure you are logged in as a root user or sudo user.
- How to enable SSH in Ubuntu 19.04
- Connect to SSH server over Local Network
- Connect to SSH server over the Internet
- Disable/Enable SSH on Ubuntu Server
- Video: How to install ssh on Ubuntu 20.04
- Conclusion
Command Table
| Commands | Description and Usages |
|---|---|
| sudo apt-get update | Update available package lists on repository |
| sudo apt-get install openssh-server | Install ssh server on ubuntu |
| sudo systemctl status ssh | Check the status of ssh service |
| sudo systemctl stop ssh.service | Stop the ssh server on Ubuntu 20.04 |
| sudo systemctl stop ssh.service | Start/Enable the ssh server on ubuntu |
How to enable SSH in Ubuntu 20.04
By default, the ssh server is not installed on ubuntu 20.04. If you want to make your machine ssh server machine then you will have to install first on you Ubuntu.
As you know installing any package is very easy, Similar you can install ssh-server from ubunut’s repository by running following command.
$sudo apt-get update
vijay@Ubuntu-20:~$sudo apt-get update
[sudo] password for vijay:
Hit:1 http://repo.mysql.com/apt/ubuntu disco InRelease
Hit:2 http://security.ubuntu.com/ubuntu disco-security InRelease
Hit:3 http://in.archive.ubuntu.com/ubuntu disco InRelease
Hit:4 http://in.archive.ubuntu.com/ubuntu disco-updates InRelease
Hit:5 http://in.archive.ubuntu.com/ubuntu disco-backports InRelease
Reading package lists... Done
vijay@Ubuntu-20:~$
Above command is used to update repository list with updated packages available on Ubuntu’s repository.
Next command to install SSH server:
$sudo apt-get install openssh-server
vijay@Ubuntu-20:~$sudo apt-get install openssh-server
Reading package lists... Done
Building dependency tree
Reading state information... Done
The following additional packages will be installed:
  ncurses-term openssh-sftp-server ssh-import-id
Suggested packages:
  molly-guard monkeysphere rssh ssh-askpass
The following NEW packages will be installed:
  ncurses-term openssh-server openssh-sftp-server ssh-import-id
0 upgraded, 4 newly installed, 0 to remove and 91 not upgraded.
Need to get 657 kB of archives.
After this operation, 5,938 kB of additional disk space will be used.
Do you want to continue? [Y/n]
SSH service is automatic start after completing installation process. To verify ssh service running or not you can use following command:
$sudo systemctl status ssh
vijay@Ubuntu-20:~$sudo systemctl status ssh
● ssh.service - OpenBSD Secure Shell server
   Loaded: loaded (/lib/systemd/system/ssh.service; enabled; vendor preset: enab
   Active: active (running) since Sun 2019-06-23 09:26:42 IST; 1min 46s ago
     Docs: man:sshd(8)
           man:sshd_config(5)
 Main PID: 5220 (sshd)
    Tasks: 1 (limit: 2332)
   Memory: 1.2M
   CGroup: /system.slice/ssh.service
           └─5220 /usr/sbin/sshd -D

Jun 23 09:26:42 Ubuntu-19 systemd[1]: Starting OpenBSD Secure Shell server...
Jun 23 09:26:42 Ubuntu-19 sshd[5220]: Server listening on 0.0.0.0 port 22.
Jun 23 09:26:42 Ubuntu-19 sshd[5220]: Server listening on :: port 22.
Jun 23 09:26:42 Ubuntu-19 systemd[1]: Started OpenBSD Secure Shell server.
Press ‘q’ to come back on terminal. You can see the status of SSH service on above example (Active: active (running)
Now you have installed ssh server successfully and the ssh service is running properly.
Next step to connect to it by ssh client on the remote machine. If you are using Linux and macOS on the remote system then it good for you because Both systems have SSH clients installed by default. In another hand, if you are using windows machine then you can use an SSH client such as PuTTY.
Download putty from Here
Connect to SSH server over Local Network
So Everything is looking good, It will be a pretty thing If you will access ssh server by another machine over the Local area network.
It will give you more pleasure If this server has been created by you.
So what are you waiting for a run following command and enjoy?
$ssh username@IP_address_of_Ubuntu_server_Machine
If you don’t know the IP address run following command to see IP address.
$ip a

Currently, I am using another Ubuntu machine. And I used the following command to access command prompt as ‘vijay’ user and remote ssh server IP is 192.168.225.46.
root@Ubuntu:~#ssh [email protected]
The authenticity of host '192.168.225.46 (192.168.225.46)' can't be established.
ECDSA key fingerprint is SHA256:Tm3Gb//wpYIL3FYdELbxcu5Hy/1PsGXPQJZtjHAKlk8.
Are you sure you want to continue connecting (yes/no)? yes
Type ‘yes’ and hit enter, it will ask password for vijay user provide it and hit enter.
Warning: Permanently added '192.168.225.46' (ECDSA) to the list of known hosts.
[email protected]'s password:
Complete process is as following:
root@Ubuntu:~#ssh [email protected]
The authenticity of host '192.168.225.46 (192.168.225.46)' can't be established.
ECDSA key fingerprint is SHA256:Tm3Gb//wpYIL3FYdELbxcu5Hy/1PsGXPQJZtjHAKlk8.
Are you sure you want to continue connecting (yes/no)? yes
Warning: Permanently added '192.168.225.46' (ECDSA) to the list of known hosts.
[email protected]'s password:
Welcome to Ubuntu 19.04 (GNU/Linux 5.0.0-17-generic x86_64)

 * Documentation:  https://help.ubuntu.com
 * Management:     https://landscape.canonical.com
 * Support:        https://ubuntu.com/advantage


89 updates can be installed immediately.
0 of these updates are security updates.

Last login: Sun Jun 23 10:35:28 2019 from 192.168.225.41
vijay@Ubuntu-19:~$
If you are using Windows Operating system on second machine, then download puTTY and install on Windows
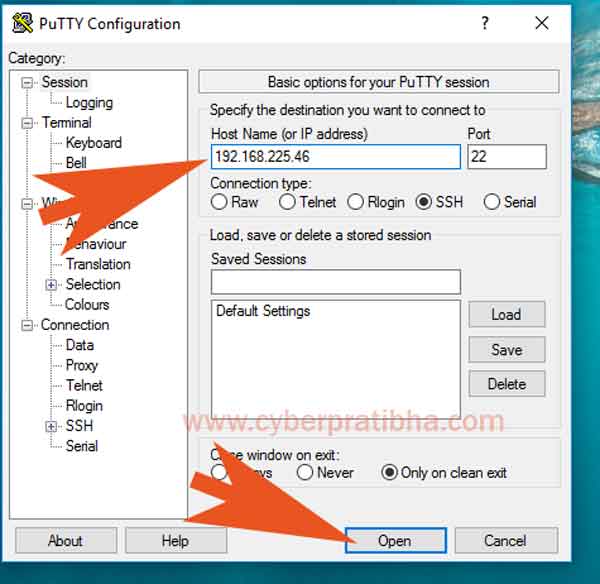
Step 1: run puTTY, Provide IP and port no. Then click on Open.
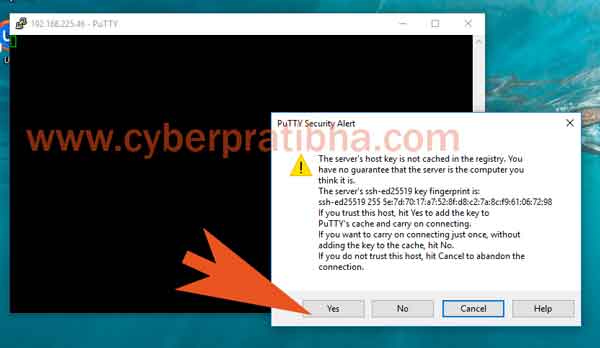
Click on Yes, this is an security alert message.
Provide username and password to access command line interface from Ubuntu with the help of ssh server.

Connect to SSH server over the Internet
If you want to connect ssh using public IP address then you will have to do port forwarding in server network.
See full article How to ssh port forwarding in router – full guide
Disable SSH on Ubuntu Server
By any reason if you want to stop ssh service on your Ubuntu machine then run following command:
vijay@Ubuntu-19:~$sudo systemctl stop ssh.service
[sudo] password for vijay:
vijay@Ubuntu-19:~$
Now check the status of ssh service.
vijay@Ubuntu-19:~$sudo systemctl status ssh.service
● ssh.service - OpenBSD Secure Shell server
   Loaded: loaded (/lib/systemd/system/ssh.service; enabled; vendor preset: enab
   Active: inactive (dead) since Sun 2019-06-23 11:21:03 IST; 25s ago
     Docs: man:sshd(8)
           man:sshd_config(5)
  Process: 5220 ExecStart=/usr/sbin/sshd -D $SSHD_OPTS (code=exited, status=0/SU
 Main PID: 5220 (code=exited, status=0/SUCCESS)

Jun 23 10:34:40 Ubuntu-19 sshd[6666]: Connection closed by 192.168.225.41 port 5
Jun 23 10:35:27 Ubuntu-19 sshd[6668]: Accepted password for vijay from 192.168.2
Jun 23 10:35:27 Ubuntu-19 sshd[6668]: pam_unix(sshd:session): session opened for
Jun 23 10:36:57 Ubuntu-19 sshd[6753]: Connection closed by 192.168.225.41 port 5
Jun 23 10:37:43 Ubuntu-19 sshd[6826]: Accepted password for vijay from 192.168.2
Jun 23 10:37:43 Ubuntu-19 sshd[6826]: pam_unix(sshd:session): session opened for
Jun 23 11:21:03 Ubuntu-19 sshd[5220]: Received signal 15; terminating.
Jun 23 11:21:03 Ubuntu-19 systemd[1]: Stopping OpenBSD Secure Shell server...
Jun 23 11:21:03 Ubuntu-19 systemd[1]: ssh.service: Succeeded.
Jun 23 11:21:03 Ubuntu-19 systemd[1]: Stopped OpenBSD Secure Shell server.
vijay@Ubuntu-19:~$
If you want to run again ssh service then run following command:
vijay@Ubuntu-19:~$sudo systemctl start ssh.service
vijay@Ubuntu-19:~$
If you want to remain stop ssh service after reboot the system then run following command to disable ssh service permanent.
vijay@Ubuntu-19:~$sudo systemctl disable ssh.service
Synchronizing state of ssh.service with SysV service script with /lib/systemd/systemd-sysv-install.
Executing: /lib/systemd/systemd-sysv-install disable ssh
Removed /etc/systemd/system/sshd.service.
Removed /etc/systemd/system/multi-user.target.wants/ssh.service.
vijay@Ubuntu-19:~$
To enable ssh service permanent run following command:
vijay@Ubuntu-19:~$sudo systemctl enable ssh.service
Synchronizing state of ssh.service with SysV service script with /lib/systemd/systemd-sysv-install.
Executing: /lib/systemd/systemd-sysv-install enable ssh
Created symlink /etc/systemd/system/sshd.service → /lib/systemd/system/ssh.service.
Created symlink /etc/systemd/system/multi-user.target.wants/ssh.service → /lib/systemd/system/ssh.service.
vijay@Ubuntu-19:~$
How to install ssh on Ubuntu 20.04 Video Tutorial in Hindi
Conclusion
You have learned successfully how to enable ssh in Ubuntu 19.04 machine. Now you can log in to your machine remotely and perform all the task by using the command prompt.
For more information, about the configuration of SSH server please read Ubuntu’s SSH/OpenSSH/Configuring Guide and the Official SSH manual page.
If you have any question, please leave in the comment box. If you have any suggestion or query drop me a mail at [email protected]
Thanks and Cheers!

