
Use of adduser Command in Linux
Description of adduser Command in Linux
In terms of user management, adduser Command in Linux operating system is an important command, which is being used for all administration like work with the system. Actually, either “adduser” or “useradd”, both the commands are functioning in similar ways. Basically, UNIX is a very large operating system which is mainly used as Server as well as Network administrative role. For this, a number of normal users are required to be created in this operating system by the administrator (root) to assign specific tasks and roles to specific users. Hence, creating and managing users is a very sensitive task for administrator (root) of the system. On the basis of importance of tasks, the users can be classified as under :-
- Normal Users. These users can only log-in with their own user name or user id and perform independently in their home directory under all the restrictions imposed by the administrator. Generally, normal users never allowed to access other user accounts or any task related to other user account holder. Normal users are responsible to maintain data and security only for their own user account.
- Root Users. Actually, the administrator of the system is known as “Root” user in the UNIX operating system. Root user can perform all the administrative task in the system. They can create, modify and delete any user account at any time. They will apply restrictions and limitations to the user on the basis of their job roles. Root user can also manage the the groups. Root user is fully responsible to maintain data and security of all the users, groups as well as the whole system.
- Sudo Users. Actually, sudo users are those users who may have been empowered by the root users to perform tasks like administrator. Means, sudo users can perform all the tasks like root users from their own user account without logging-in with root users.
User Management in Linux
User management tasks in operating system can be performed with the help of following three commands :-
- adduser Command in Linux – This command is used to add or create any user in the system.
- usermod Command in Linux – This command is used to modify security level, limitations and accessibility of any user already created in the system.
- userdel Command in Linux – This command is used to delete and remove any user and/or its home directory.
Following color coding is used to describe the content better in applying useradd command in Linux.
- Bold Font with blue color – Commands and options
- Italic Font with red color – User name or User ID
- Bold Italic Font with green color – Files and directories
Syntax
Creating a New User
adduser [username]
useradd [username]
Modifying User Account
usermod [-option] [username]
Deleting User Account
userdel [-option] [username]
Additional Command Used to Understand adduser Command in Linux
ls /home

Description : This command will show all the available normal users as well as sudo users in the system in “/home” directory.
cat /etc/passwd

Description :- This will display the file “passwd” kept in “/etc” directory. The output shows the details of all root, system and normal user account including sudo users. In addition to the normal users, as shown under “/home” directory, there are many more users available in the system which were automatically created by the system at the time of installation of operating system. Each line pertains to the specific details of each users, which will be discussed below.
grep gosu /etc/passwd

Description : This will show user details of only that user, whose name entered after the command “grep“. In the diagram, the details of user “gosu” shown with user ID “1004” and Group ID “1004“.
id gobu

Description : This will display the details of User ID of user “gobu“.
Application of adduser Command in Linux
Creating a New User by Root User
adduser mohan

Description : A user with user name “mohan” will create with home directory and binary system by default. However, security features like password, accessibility options etc will not be set for the user. That will be set by the root user with other command later.
useradd mahan
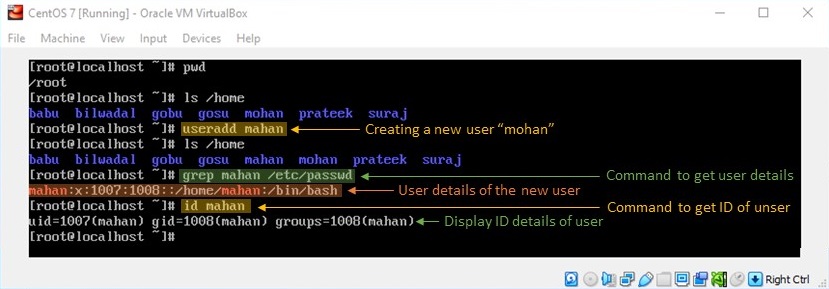
Description : A user with user name “mahan” will create with same features like “adduser” command.
Account Status of Newly Created User Account
grep mahan /etc/passwd

Description : Actually, whenever a user created, its details automatically written in the “passwd” file under “/etc” directory by the system. The details of user account will be shown with 7 different tabs, as under :-
- 1st tab – Username, it may contain upto 32 characters.
- 2nd tab – The symbol “x” shows the password option. In this case, by default, the password will be locked on creating a new user account.
- 3rd tab – User Unique ID or you can call User UID. This is unique ID number automatically generated by the system with next serial number of previously allotted UID. The scheme of allotment of UID by the system is as follows :-
- UID “0” represents the root user.
- UID from 1 to 99 used for pre-defined accounts of the system.
- UID from 100 to 999 are being allotted to system user accounts and groups.
- All the normal users will give UID from 1000 onward upto 9999.
- 4th tab – Group Unique ID or you can say GID. On creation of each user account, the user will compulsorily join a group with same group name automatically by the system. Hence, a group ID is also being allotted to the user’s group in the same scheme of UID.
- 5th tab – User information. Basically, full name of user or any comment for the unser can be stored in this tab.
- 6th tab – Home directory path will be visible at this tab.
- 7th tab – Binary scheme of the user account will display here.
Setting Up Password and Password Policy for the Created User
Once, you create a user with the help of “useradd” or “adduser” command, you can set password of the user any time with use of “passwd” command. Also all the accessibility privilege can be imposed with the various options of “passwd” command. A detailed explanation about “passwd” command in linux is also available at the blog link How to Use passwd Command in Linux : Detailed Overview.
Creating a New User by Sudo User
sudo gobu silviya

Description : As per the diagram, initially the user “mohan” tried to create a new user “silviya” as a sudo user. But, the system says that “mohan” is not a sudo user. Actually, there is a default group “wheel” exists in linux. The users, who are member of this group, will be performed as sudo users. So, on reading id details of user “gobu” it is found that this user is a member of group “wheel” and accordingly, the user “gobu” can be called as sudo user. Hence, the user “gobu“, being a sudo user, created the new user “silviya“.
Root User can Appoint a Normal User as Sudo User
usermod -aG wheel silviya

Description : A default group “wheel” already exists in the system. Any user member of this “wheel” group will act as Sudo user. Initially, the normal user “silviya” was not a member of group “wheel“. Therefore, to covert normal user “silviya” to sudo user, it is necessary for user “silviya” to became member of the group “wheel“. After applying command “usermod” with option “-aG” by root user, the user “silviya” became member of group “wheel“. Accordingly, the normal user “silviya” became a Sudo user.
Creating Users with Important Options
Creating a User and Adding him as Member of One or More Groups
useradd -G marketing,sales,hr hod

Description : There are three groups “marketing“, “sales” and “hr” in the system. A user “hod” created and also added him as member of all these three groups at once. In the command line, the group id can be separated with commas, if the user will add as member of more than one group.
Creating User with Allotting a Custom User ID
useradd -u 1503 zivi

Description : User ID 1503 allotted to newly created user “zivi“. However, it should be kept in mind that the user ID as specified must be unique and have already not allotted to any other user by the system earlier.
Creating User and Adding him as Member of a Group with Group ID
useradd -u 1506 -g 1012 rose
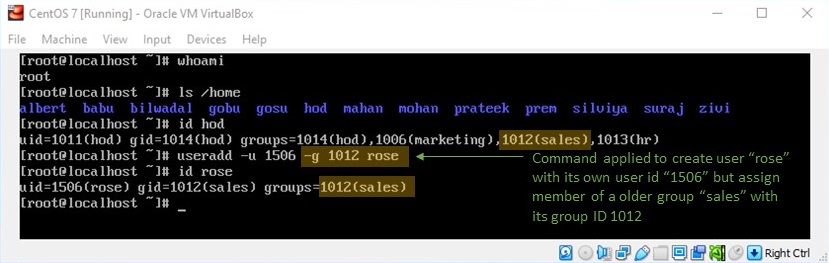
Description : A user “rose” created with group ID 1506 and also nominated as member of the group “sales“, whose group id is 1012. By default, on creating a user, a group of the same name also created by the system. However, on using “-g” option with “useradd” command, the user can be joined as member of already created group.
Creating User with Other than Default Home Directory
useradd -d /personal shibu
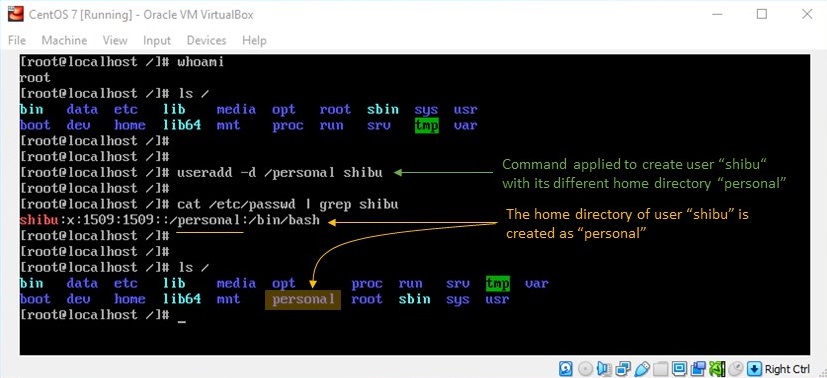
Description : By default, all the user are being created in the “/home” directory. However, on use of option “-d” with “useradd” command, the user account will be created under a different directory as specified.
Creating User Without any Home Directory
useradd -M yunus

Description : If we want to create a user without any home directory, we can use option “-M” with “useradd” command. Such types of user may be needed for any specific security reasons, when root does not want to view the home directory of the user by anybody. However, on creating such user, the home directory will be shown under “/home” directory. But on listing of directory “/home“, no such user will be found.
Creating User with User Name or Specific Comments
useradd -c “Rohit Sharma” rohis

Description : User name “rohis” with user ID “1511” created with name of user as “Rohit Sharma“.
Creating User without Creating Default Group of same Name
useradd -N pardip

Description : By default, on creating every user, a group of same name of user will be created. On using this option “-N” with “useradd” command, no default group of same name will be created.
Creating a User with a Duplicate User ID (Non Unique)
useradd -o -u 1011 -g 1012 roza

Description : When there is a need to create a user with a user ID already defined with another user earlier, you can use “-o” option with all the subsequent options as per diagram. In the diagram, the UID 1011 already assigned to user “hod” earlier and group ID 1012 already assigned to group “sales“.
Use of Other available Options with “useradd” Command
| Command with Options | Description of Output of the Command |
|---|---|
| useradd -e 2020-07-15 sunil | On creating a user normally, the user account expiry date is set to zero by default. However, if we need to create a user account with account expiry date, we can use option “-e” followed by the date in format “YYYY-MM-DD” and user name. |
| useradd -e 2020-05-27 -f 15 ram | use of “-e” and “-f” options with “useradd” command will define the password expiry date as well as the inactive period of 15 days after which the account will be inactive after expiry of password on 27 May 2020. |
| useradd -b | Base directory for the home directory of the new account. To know more about Home Directory you can visit here. |
| useradd -D | Display the default user account configuration. |
| useradd -k | Use this alternative skeleton directory. For more details you can visit here. |
| useradd -K | Override /etc/login.defs dafaults. For more details you can visit here. |
| useradd -l silvi | To create user account “silvi” but do not want to register last-log and fail-log entry of the user in the database, this command with option can be used. Entry regarding last log-in and unsuccessful log-in attempts will not be registered in the database/logbook. |
| useradd -m silvi | To create home directory of the user. However, the home directory of each users are automatically being created by the system by default. |
| useradd -p abcd@1234 silvi | User Account “silvi” will be created with its password “abcd@1234”. |
| useradd -r silvi | To create a system user account. |
| useradd -R silvi | Create the user “silvi” with home directory to chroot (child root). Chroot environment can be used to create and host a separate virtual copy of the software system, which may be used for Testing & development, Dependency control, Compatibility and recovery issues. To know more about Chroot, you can visit here. |
| useradd -s silvi | Create a user “silvi” with different login shell (binary folder). |
| useradd -U silvi | To create a group with the same name as the user. However, by default, also a group of same name of user is being created on creating a user. |
| useradd -Z silvi | Use a specific SEUSER for the SELinux user mapping. SELinux login mappings allow for the Linux administrator to map a Linux account to a SELinux user. To know more about SELinux, you can visit here. |
Getting Help on the adduser Command
adduser -h

Description : Display a list of all options of adduser Command in Linux.
You can also visit at the following links to read more on Linux :-

